Actions & steps reference (the "do")
Written By Timothy Murenzi
Steps run in order, left to right along the canvas. Add one with + Add step at the top right of the builder, then click it to set it up in the Node Configuration panel.
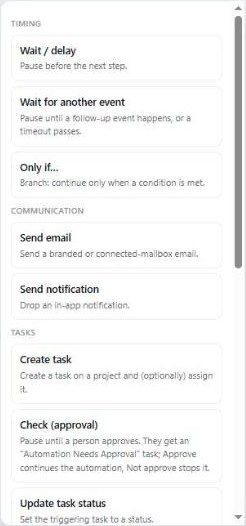
Timing
Wait / delay — pause for minutes, hours or days before the next step.
Wait for another event — pause until a follow-up event happens, or a timeout passes (see Timing).
Only if… — branch: continue only when a condition is met (see Conditions).
Communication
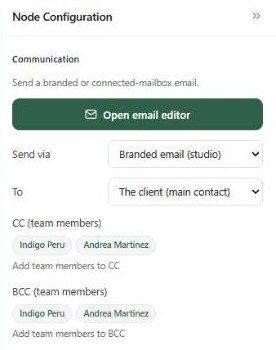
Send email — a branded email from your studio. Set it up with:
Send via — Branded email (studio). (My connected mailbox is coming soon.)
To — The client (main contact), Main contact + project stakeholders, The record owner (studio), The task assignee, The lead contact, or A specific email…
CC / BCC (team members) — click team members to copy them in.
Open email editor — write the subject and message (see below).
Send notification — drop an in-app notification for the studio owner, specific team members or the client portal.
The email editor
Click Open email editor on a Send email step.
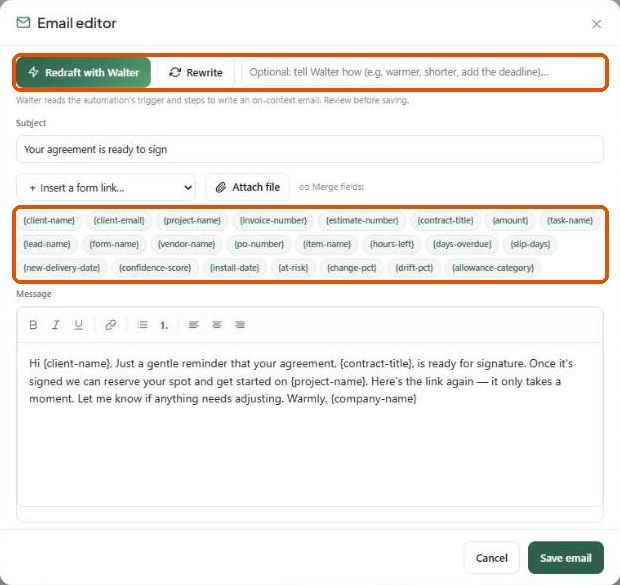
Redraft with Walter — Walter reads the automation's trigger and steps and writes an email that fits. Type a hint in the box beside it (e.g. "warmer, shorter, add the deadline") and click Rewrite to adjust.
Subject and Message — the message box has bold, italic, underline, links, lists and alignment.
Insert a form link… — drop a link to one of your forms into the message.
Attach file — attach a document to every email this step sends.
Merge fields — click a chip to insert it: {client-name}, {client-email}, {project-name}, {invoice-number}, {estimate-number}, {contract-title}, {amount}, {task-name}, {lead-name}, {form-name}, {vendor-name}, {po-number}, {item-name}, {hours-left}, {days-overdue}, {slip-days}, {new-delivery-date}, {confidence-score}, {install-date}, {at-risk}, {change-pct}, {drift-pct}, {allowance-category}. They fill in when the email sends — but only if that information exists for the trigger.
Click Save email.
Tasks
Create task — create a task on a project and (optionally) assign it.
Check (approval) — pause until a person approves. They get an Automation Needs Approval task; Approve continues the automation, Not approve stops it.
Update task status — set the triggering task to a status.
Assign task — assign a member to the triggering task, with an optional due date.
Create Asana task — push a task into the Asana project linked to the triggering project.
Projects
Update project status — change the related project's status.
Set project phase — move the related project to a phase.
Leads
Move lead stage, Set lead status (open/won/lost), Add lead note, Create lead task
Combine steps into a real workflow. One automation can notify your team, wait two days, check whether the invoice is still unpaid, and then email the client.
Was this helpful?
Still need help? Ask the team